Create a payment app
A payment app is a type of app integrated with the SHOPLINE Admin, which provides merchants with customized payment processing services. Only partners that meet SHOPLINE’s requirements are eligible to build payment apps in the SHOPLINE Partner Portal.
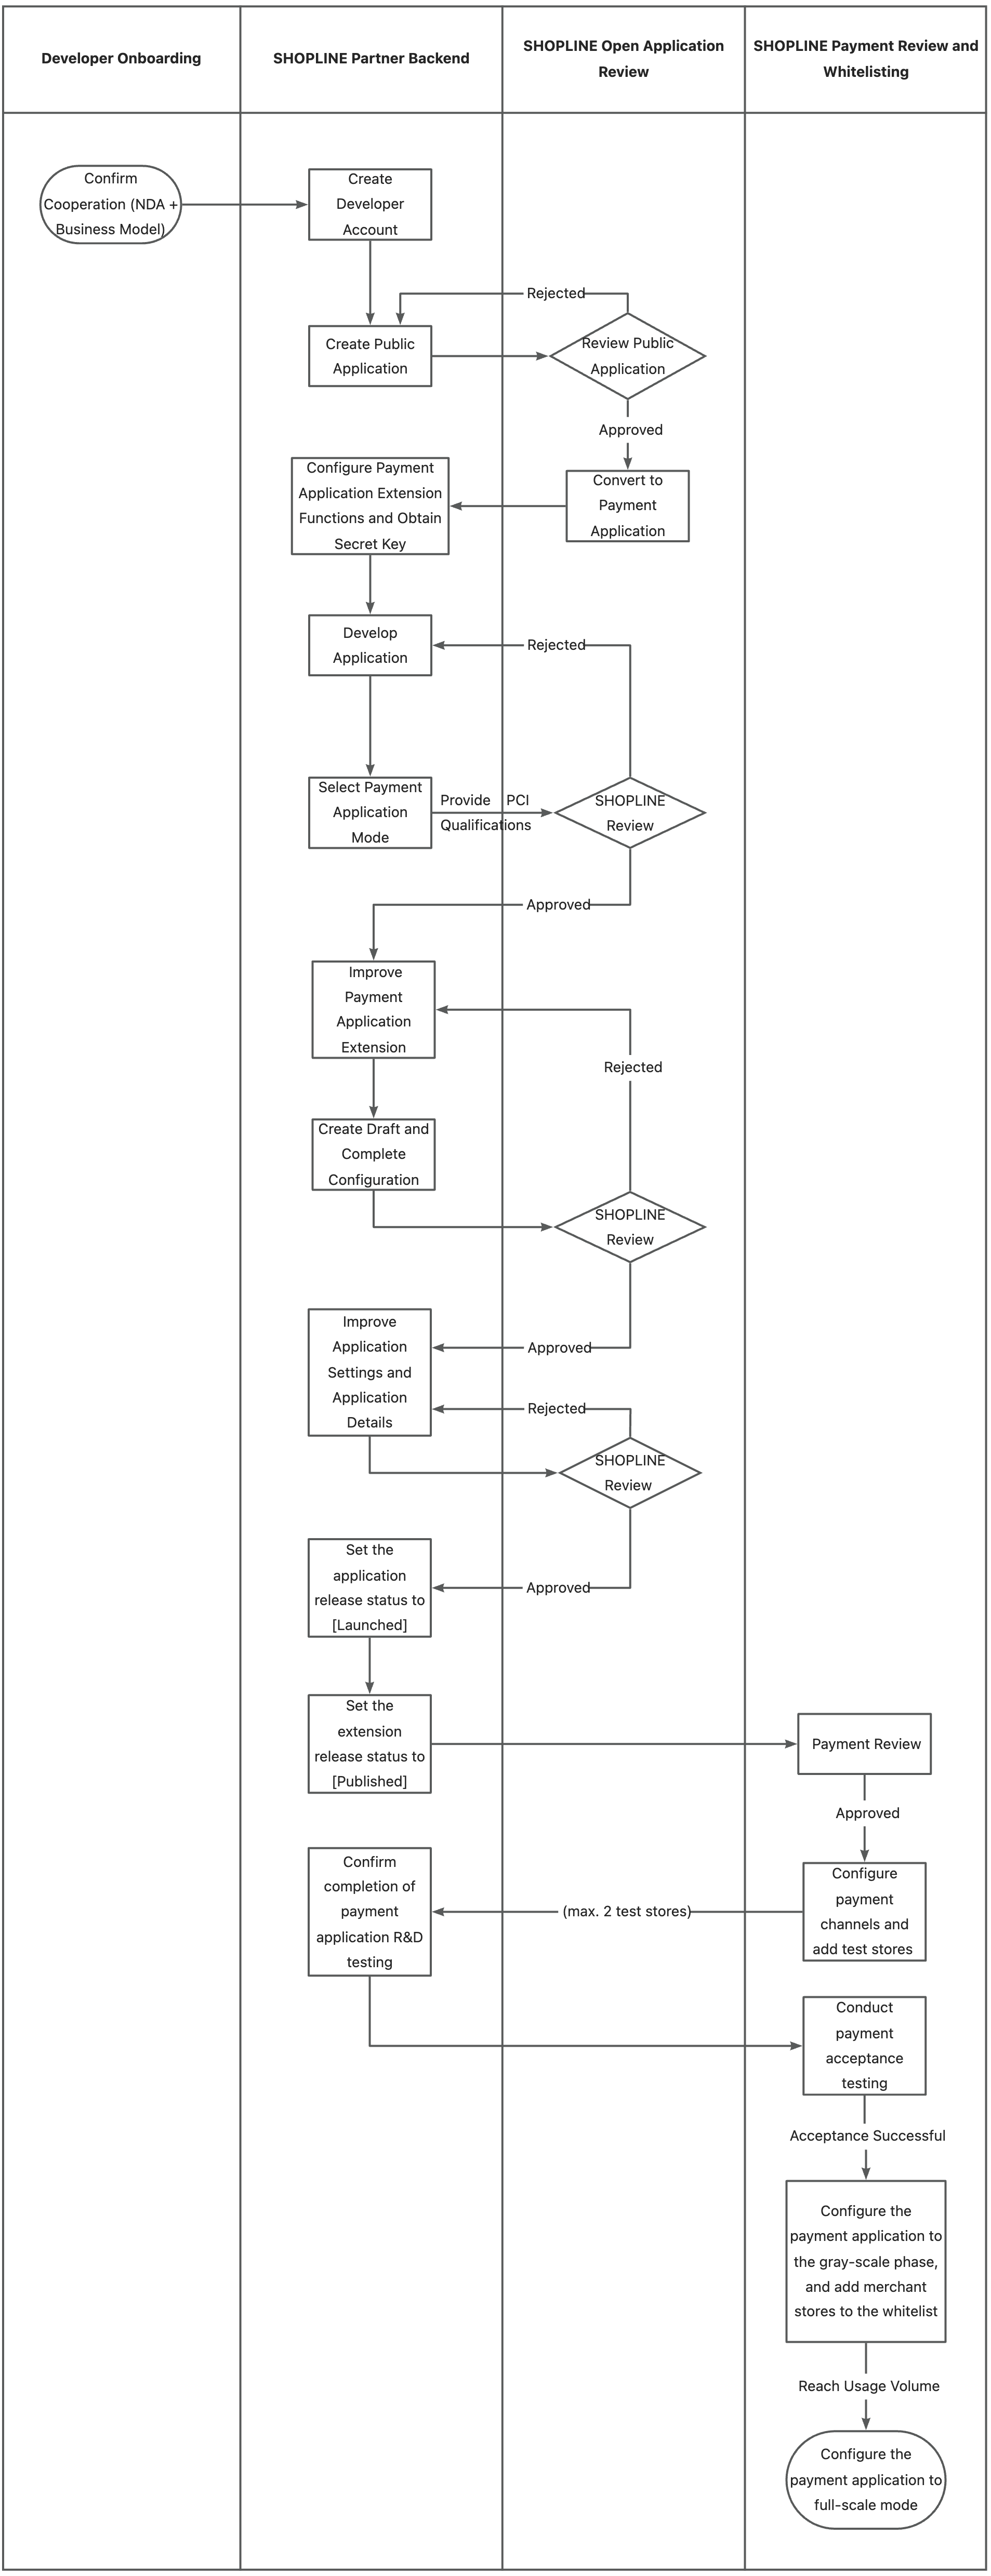
Follow the steps below to avoid common issues systematically and complete payment app development efficiently.
Workflow
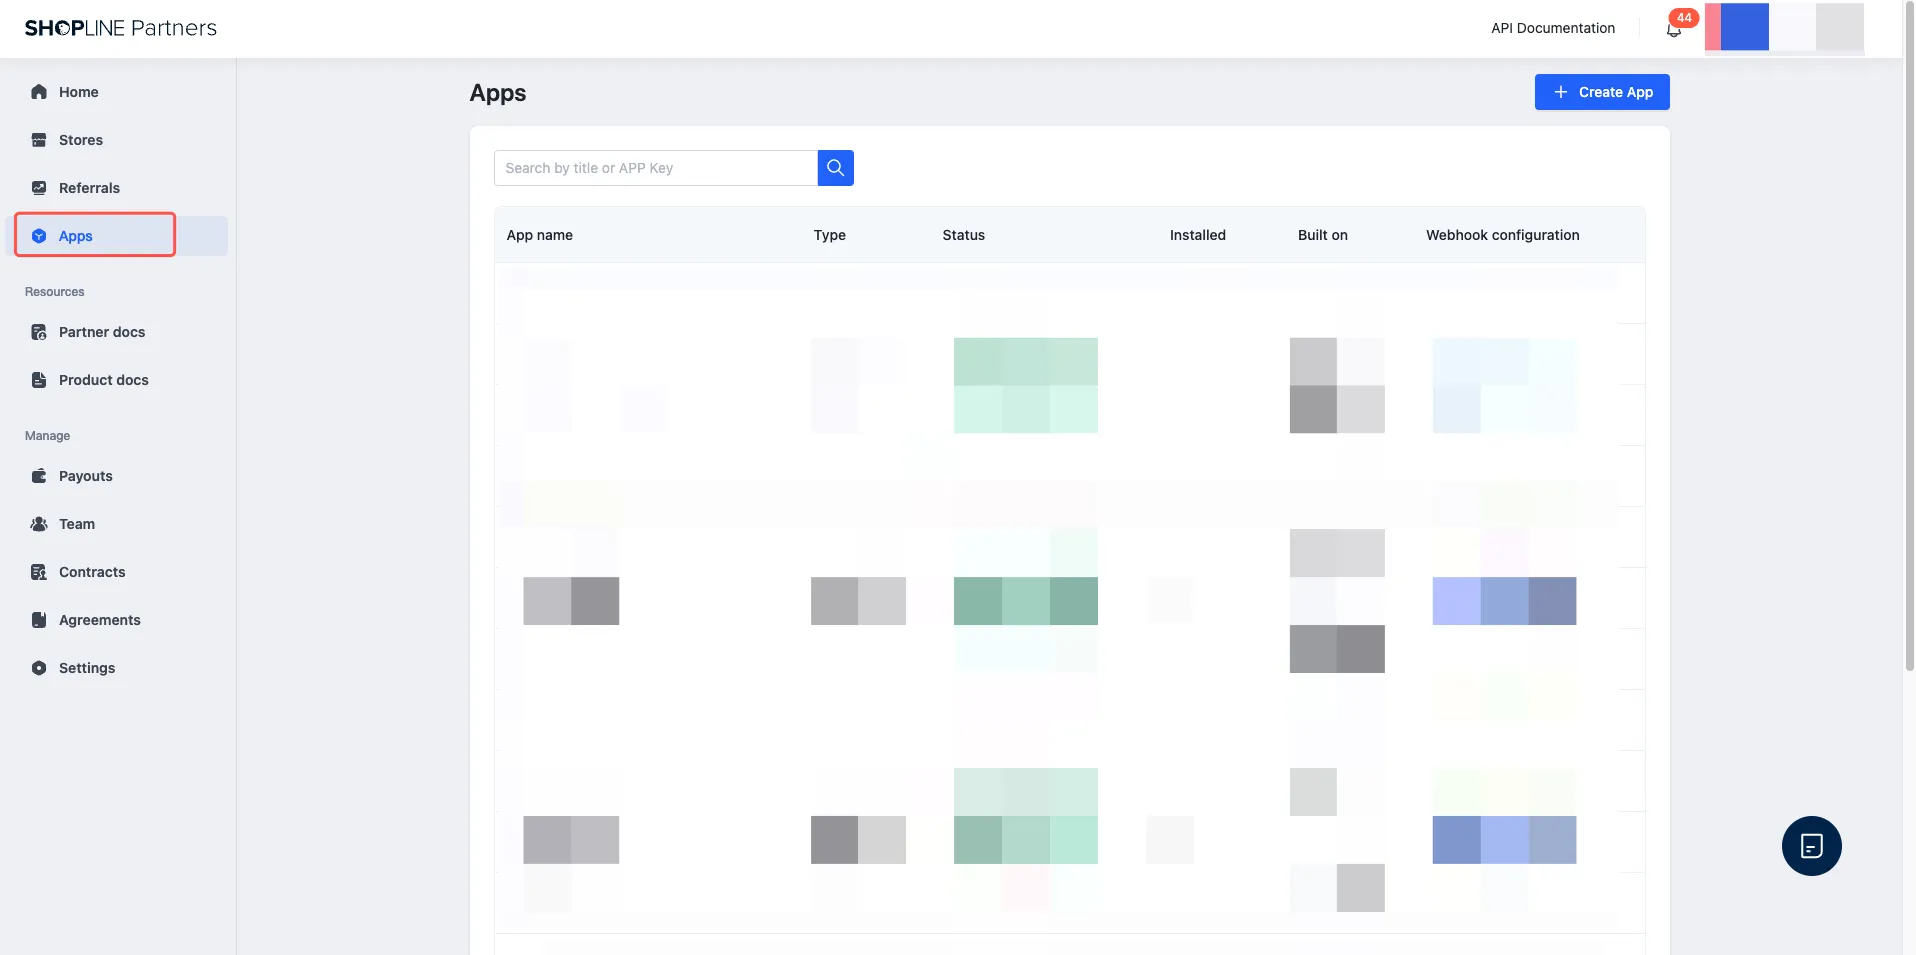
1. Create a public app
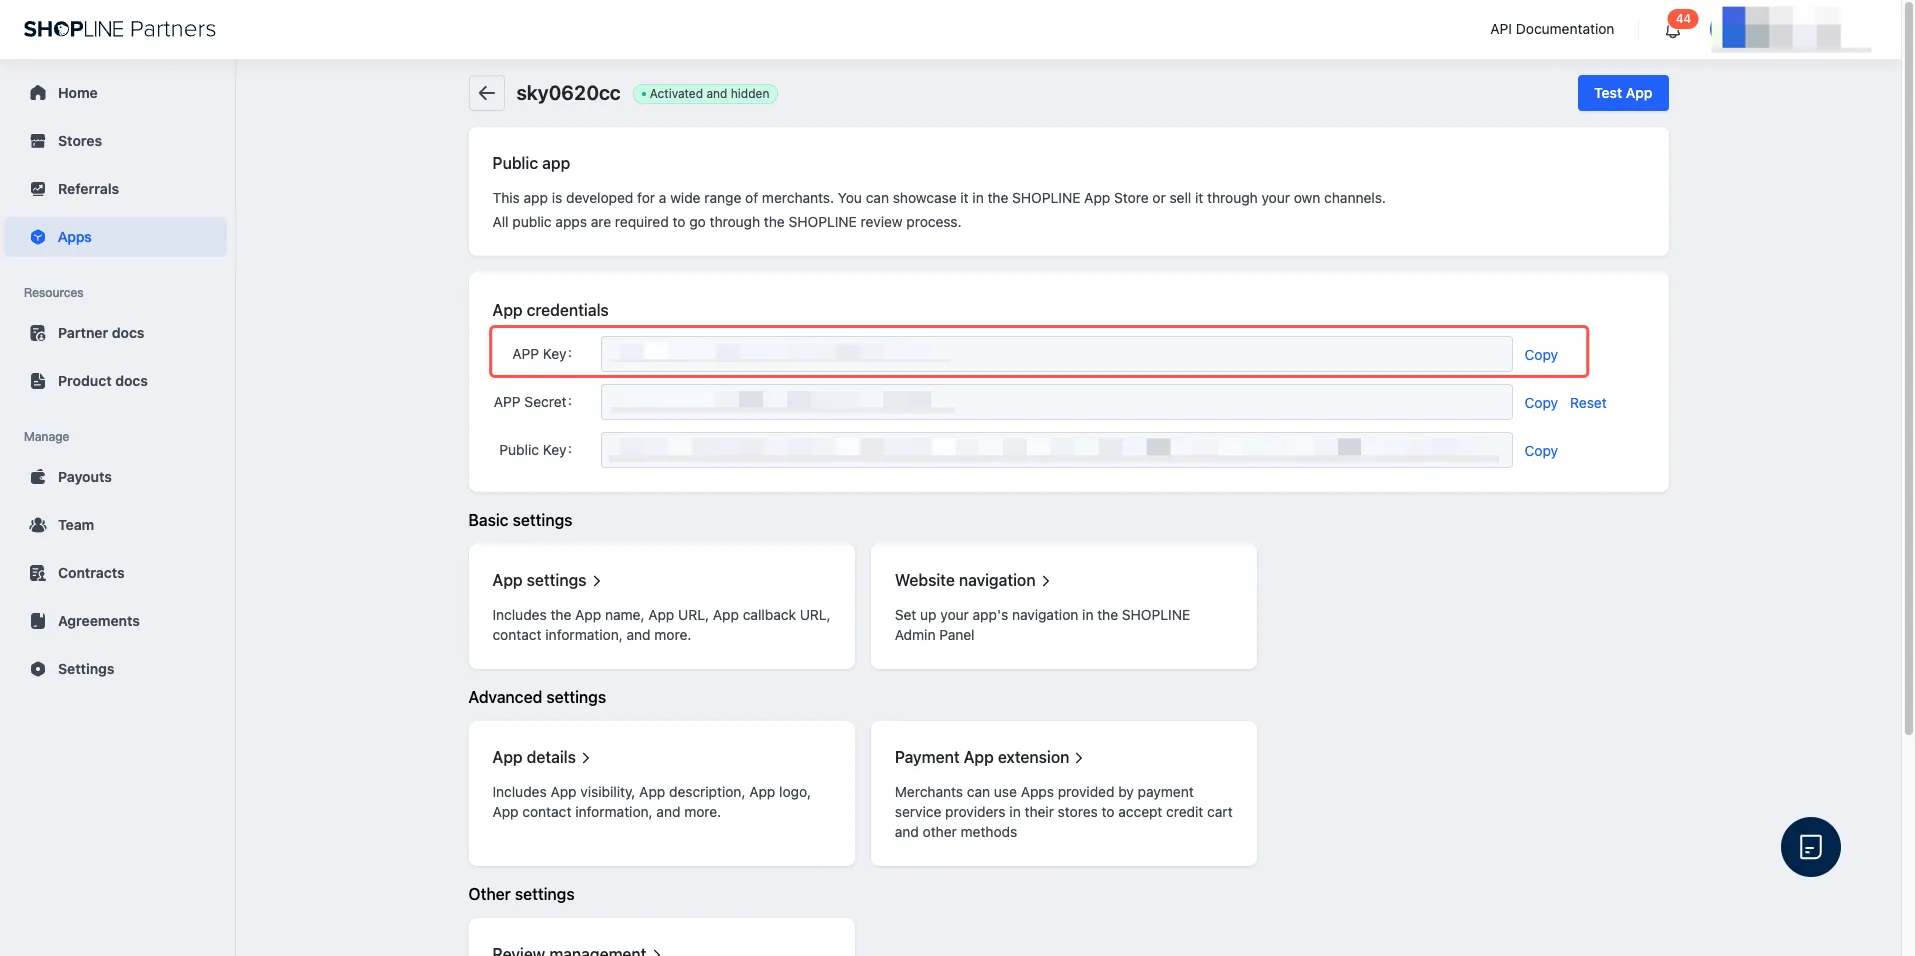
Before integrating a payment app, you need to create a public app in the SHOPLINE Partner Portal and obtain the APP Key and APP Secret. These two parameters are required for the review process and subsequent authorization. For details on creating a public app, refer to Configuring public apps.
2. Convert public apps to a payment app
After successfully creating a public app, the system will generate a corresponding APP Key. Send the key to your SHOPLINE technical contact. SHOPLINE will convert the public app into a payment app.
3. Configure the payment app
Once your public app is converted to a payment app, re-enter the app details page to configure the payment app.
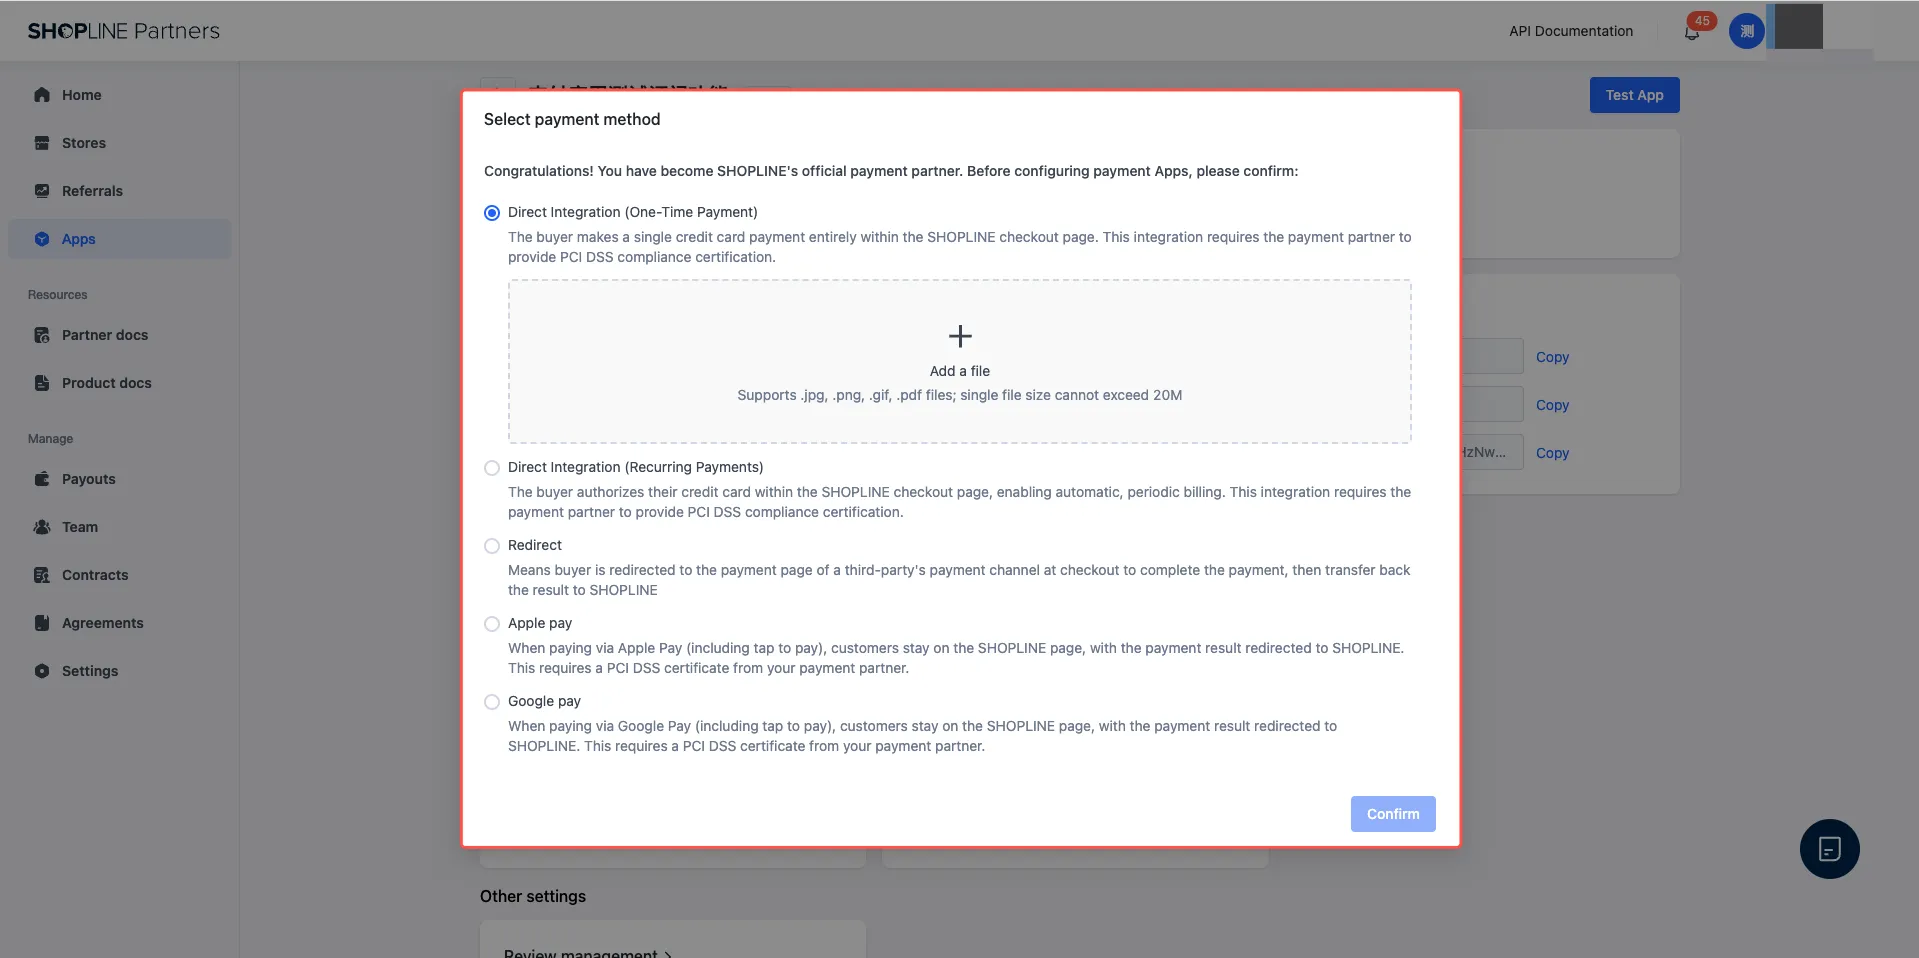
3.1 Confirm the payment mode
After accessing the payment app, you need to confirm its payment mode. SHOPLINE Payments supports the following modes, and you can select one or more options. To enable Apple Pay or Google Pay express payment, you must first sign a commercial agreement with your SHOPLINE business contact. Once the agreement is approved, you can select these features in the payment mode configuration.
- Direct Integration (One-time Payment): In this mode, buyers authorize one-time credit card payments directly on the SHOPLINE checkout page without being redirected to a third-party platform. This mode requires the payment partner to provide a PCI DSS compliance certificate (AOC).
- SHOPLINE determines the validity period of the payment app based on the uploaded AOC report. If your AOC report is updated, log in to the SHOPLINE Partner Portal, navigate to Apps > App details > App settings > Payment mode > View or update AOC report, and upload the latest version. The app will be taken offline if the existing certificate expires.
- Direct Integration (Recurring Payment): Buyers authorize their credit cards within the SHOPLINE checkout page, enabling automatic and periodic billing. This mode requires the payment partner to provide a PCI DSS compliance certificate.
- Redirect: Buyers are redirected to a third-party payment channel page to complete transactions, and the payment result is synchronized back to SHOPLINE.
- Apple Pay: Buyers complete payments via Apple Pay (including express payment) directly on the SHOPLINE checkout page, with the payment result synchronized back to SHOPLINE. This mode requires the payment partner to provide a PCI DSS compliance certificate.
- Google Pay: Buyers complete payments via Google Pay (including express payment) directly on the SHOPLINE checkout page, with the payment result synchronized back to SHOPLINE. This mode requires the payment partner to provide a PCI DSS compliance certificate.
3.2 Set up payment app extensions
After configuring the payment mode, proceed to set up app extensions.
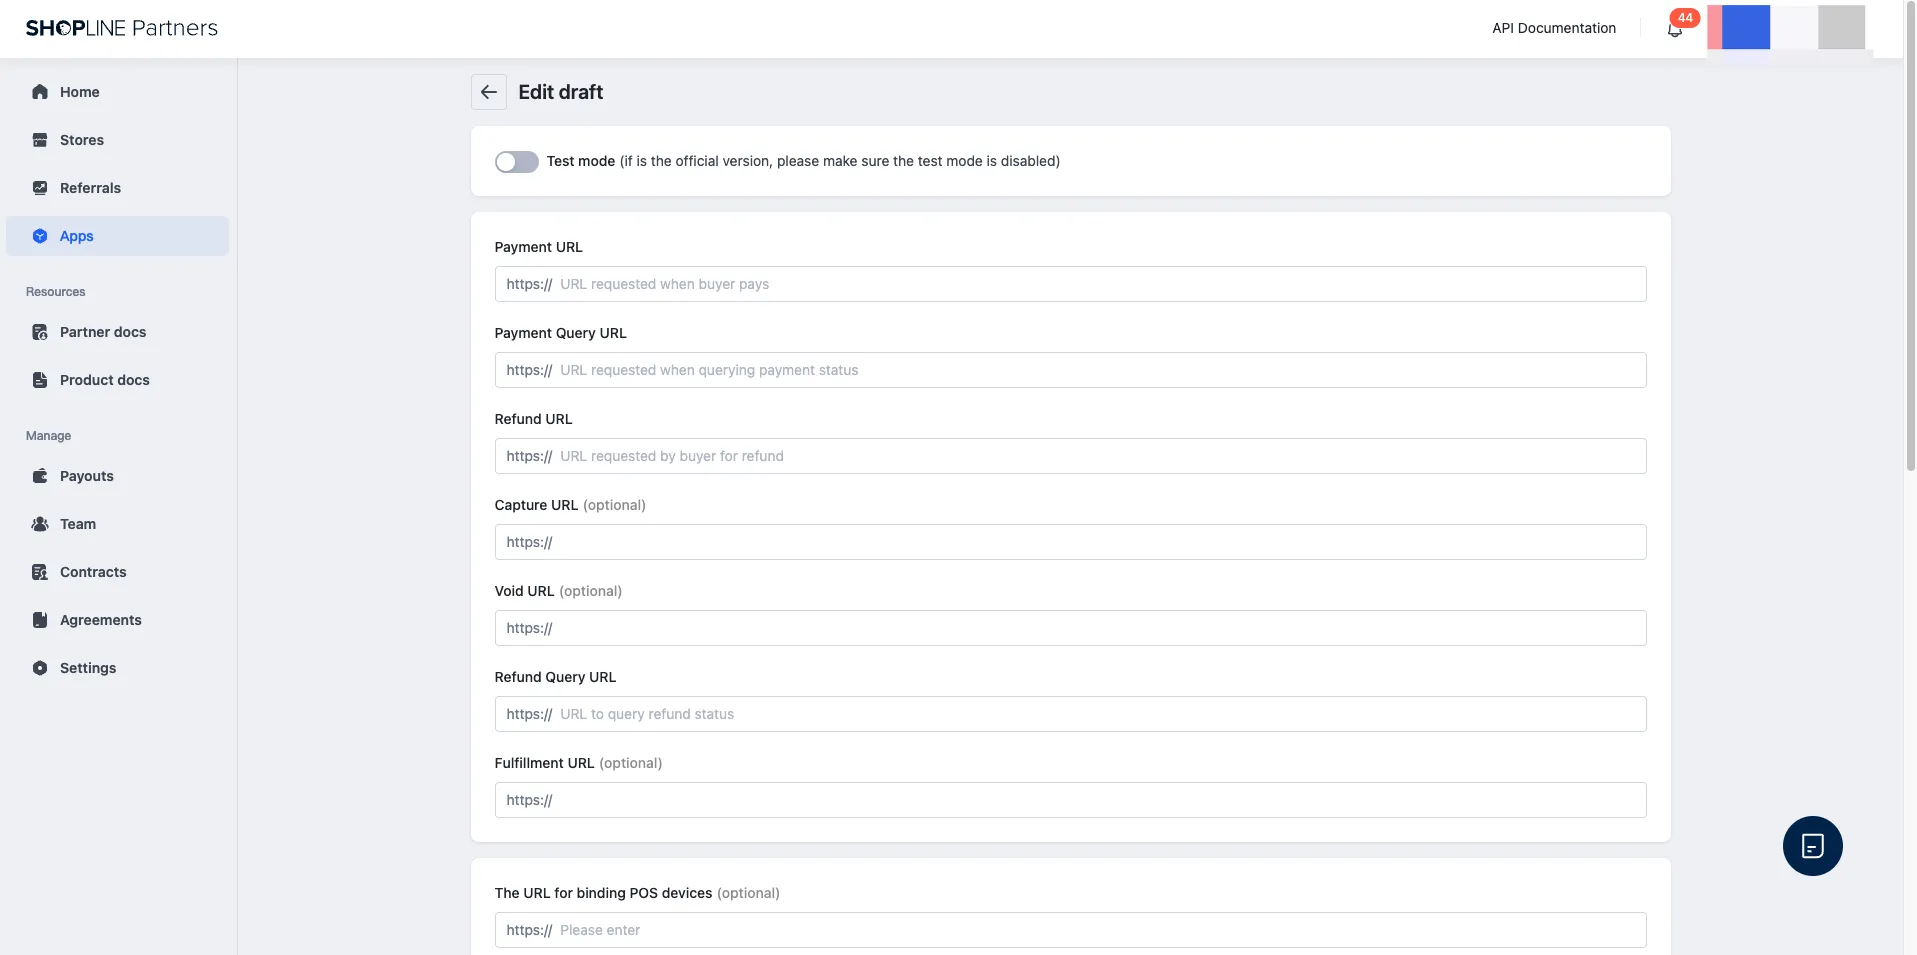
Log in to the SHOPLINE Partner Portal, navigate to Apps > App details > Payment app extensions, and click Create draft. On the Edit draft page, complete the following configurations:
- Test mode: Both test mode and official mode are supported. Test mode is enabled by default. Ensure the test mode is disabled for the official version.
- Payment app URLs: Provide URLs for corresponding APIs. These URLs will be used in the payment app workflow.
- Payment URL: The URL requested when a buyer pays. Required.
- Payment Query URL: The URL requested when querying payment status. Required.
- Refund URL: The URL requested by a buyer for a refund. Required.
- Capture URL (Optional): The URL for the capture function. This parameter is required if the function is enabled.
- Void URL (Optional): The URL for the void function. This parameter is required if the void function is enabled.
- Refund Query URL: The URL to query refund status. Required.
- Shipping Information Reporting URL (Optional): The URL for the shipping function. This parameter is required if the shipping function is enabled.
- Name: This configuration determines the display name of your payment app in the SHOPLINE Admin and on the buyer checkout page.

- Payment method: Configure the payment method icon here. The icon will be displayed in the following scenarios:
- When merchants activate the payment app
- When buyers proceed through the checkout process

- Country or region configuration: Configure the countries or regions supported by your payment app. The payment app will be displayed on the checkout page only if the buyer’s shipping address falls within the configured countries or regions.

- Public key configuration: Enter your public key here. When the payment app interacts with SHOPLINE, SHOPLINE will use this public key to verify the signature of requests and responses from the payment app. For specific rules, refer to the payment app Signature logic.

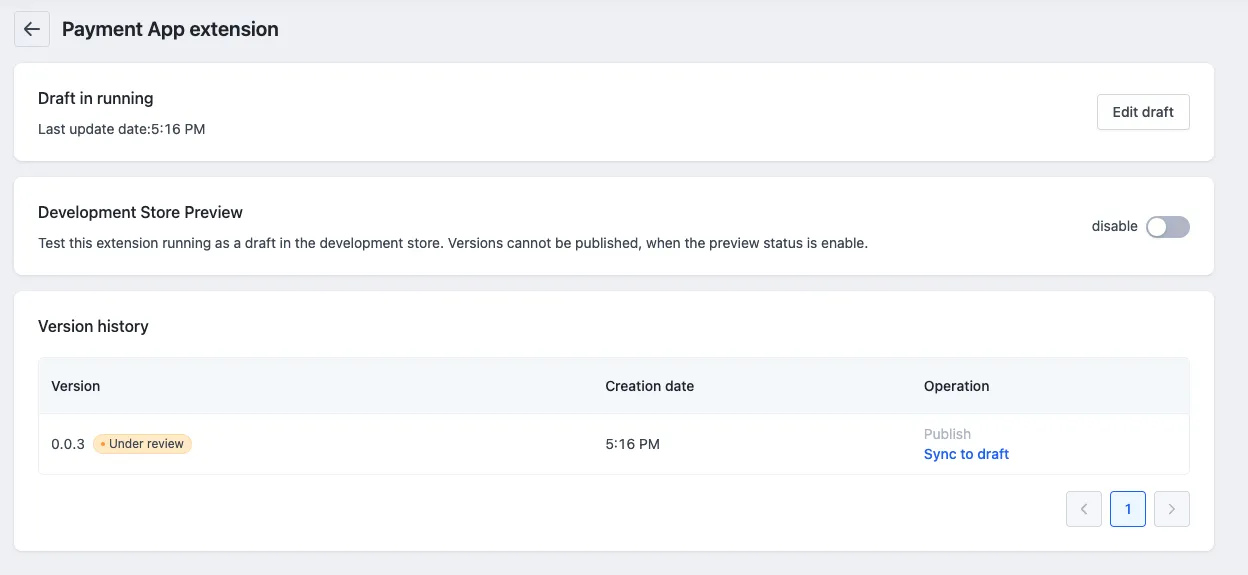
- Submit payment app extensions for review: After completing the configuration, click Create Version. On the Partner Portal > Apps > App details > Payment app extensions page, locate the newly created version and click Submit for review.
Subsequently, coordinate with your SHOPLINE contact to track the review progress. After the payment app extension is approved, click Publish to officially activate the version.
- Review for Apple Pay or Google Pay express payment: If you need to enable express payment features, submit a ticket or contact your business contact to sign a commercial agreement. Once the agreement is approved, you can follow the steps to enable the relevant functions.
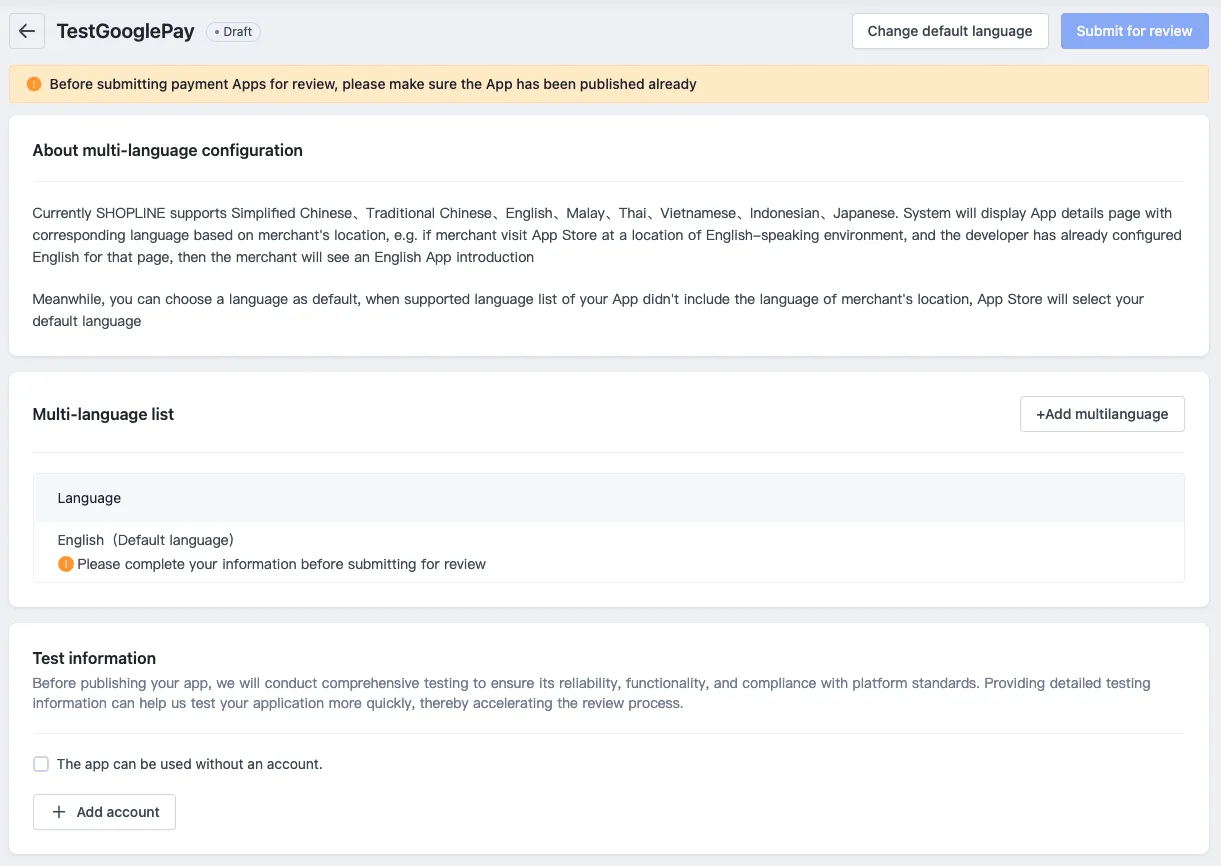
3.3 Submit the payment app for review
After completing the extension settings, submit the extension for review by following these steps:
Log in to the SHOPLINE Partner Portal, navigate to Apps > App details > Payment app extensions, select the version to be reviewed, and click the Submit for review button in the upper right corner.
After submission, maintain close communication with your SHOPLINE technical contact to track the review progress. After the app is approved, click Publish to officially activate the payment app extension version.
3.4 Add stores to the whitelist
After the app is approved, its initial status will be Published but Invisible. Provide the app handle to your SHOPLINE technical contact to add stores to the whitelist. When the app reaches the usage threshold specified in the business agreement, you can apply for full-release mode, which allows all stores to access the app without whitelisting. For detailed terms, consult your SHOPLINE business contact.

'%3e%3crect%20x='6'%20y='7.13049'%20width='13'%20height='10'%20rx='1'%20fill='black'/%3e%3cpath%20d='M12.4998%2012.936L-3.65042%200.604835L28.65%200.604838L12.4998%2012.936Z'%20stroke='white'%20stroke-linejoin='round'/%3e%3c/g%3e%3cdefs%3e%3cclipPath%20id='clip0_716_14611'%3e%3crect%20x='6'%20y='7.13049'%20width='13'%20height='10'%20rx='1'%20fill='white'/%3e%3c/clipPath%3e%3c/defs%3e%3c/svg%3e)

'%3e%3crect%20x='5.63086'%20y='7.26086'%20width='13'%20height='10'%20rx='1'%20fill='white'/%3e%3cpath%20d='M12.1306%2013.0664L-4.01956%200.735206L28.2809%200.735209L12.1306%2013.0664Z'%20stroke='%231A2C42'%20stroke-linejoin='round'/%3e%3c/g%3e%3cdefs%3e%3cclipPath%20id='clip0_716_14599'%3e%3crect%20x='5.63086'%20y='7.26086'%20width='13'%20height='10'%20rx='1'%20fill='white'/%3e%3c/clipPath%3e%3c/defs%3e%3c/svg%3e)