Theme editor
The theme editor is a tool that enables merchants to customize their store's content and style with real-time previews. As a developer, you can empower merchants to personalize their themes by providing theme configurations along with modular sections and blocks.
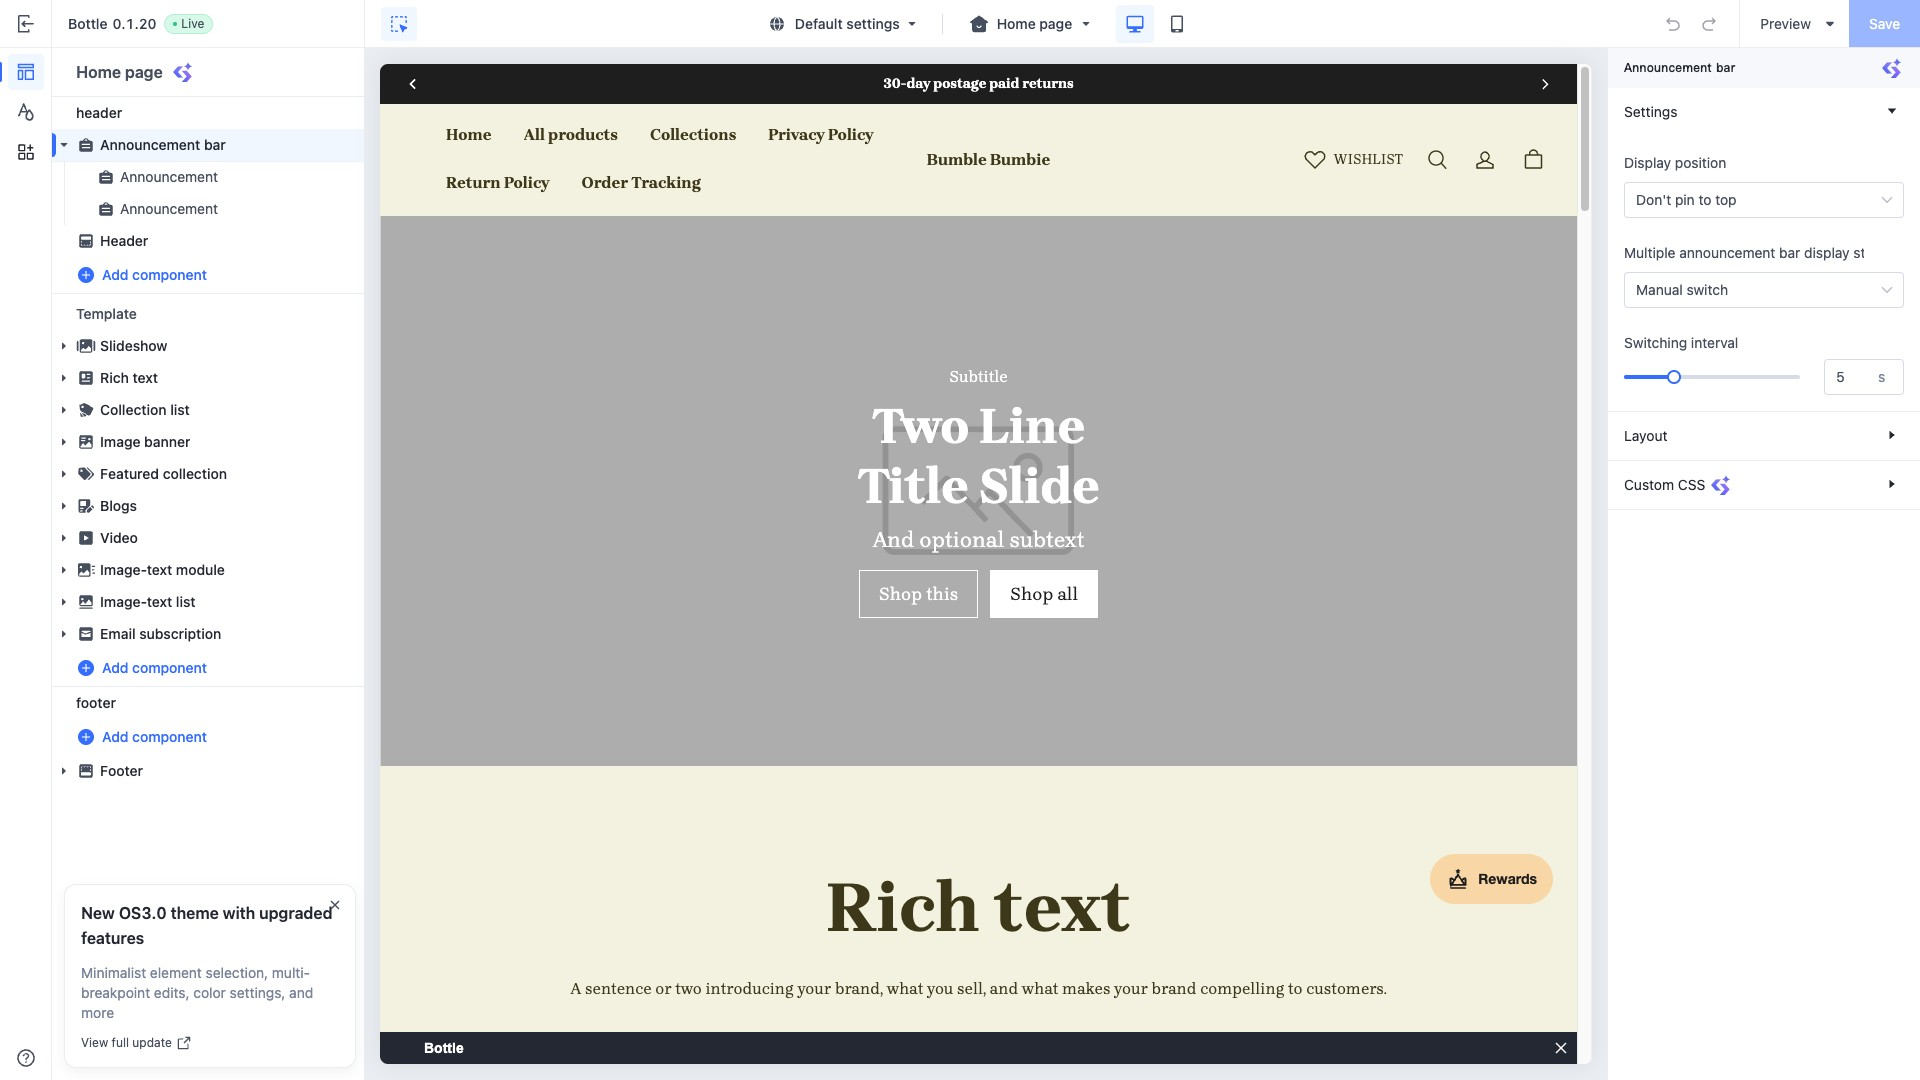
Accessing the theme editor
Access via the SHOPLINE Admin
Merchants can access the theme editor in the SHOPLINE Admin by following these steps:
- Log in to the SHOPLINE Admin and navigate to Online Store > Design.
- Locate the theme you wish to edit and click Design.
Developer preview access
To see the theme from a merchant's perspective, you can preview it directly within the theme editor. During development, you can access the editor through the following methods:
- Real-time preview: Use the SHOPLINE CLI serve command to run the theme as a development theme for live preview during development.
- Sync to theme library: Use the SHOPLINE CLI push command to upload and sync your theme to the store.
- Manual installation for preview: Use the SHOPLINE CLI package command to bundle the theme into a ZIP file. Then, in the SHOPLINE Admin, go to Online Store > Add Theme > Upload Theme to install it manually.
Definition and storage of theme configurations
The theme configurations available to merchants in the theme editor are governed by the theme itself. The following table outlines where these configurations are defined and stored.
| Configuration type | Definition location | Storage location |
|---|---|---|
| Global configuration | theme.schema.json file | theme.config.json file |
| Section configuration | Settings within the {{#schema}} tag of a section file | Corresponding page template file in the templates directory |
| Block configuration | Settings within the {{#schema}} tag of a block file | Nested within the parent section settings and saved in the page template file |
Integrating the theme into the theme editor
When you customize sections in the theme editor, the HTML content is dynamically added, removed, or re-rendered within the existing DOM without a full page refresh. However, JavaScript that runs only on the initial page load will not automatically re-execute during these updates.
Additionally, you must ensure a seamless experience when a merchant interacts with sections or blocks. For example, selecting a slideshow section should automatically scroll it into the viewport and selecting a specific block within that section should also pause the auto-rotation.
To detect operations within the theme editor, such as selecting or reordering sections and blocks, you can listen for JavaScript events triggered by the editor. If you need to prevent certain code from running inside the theme editor, use Sline and JavaScript variables to identify the environment and control code execution accordingly.
JavaScript events
To identify sections and blocks, the theme editor detects specific data attributes on their parent elements. Each section is wrapped in an element generated by SHOPLINE, which includes these attributes by default.
The theme editor emits JavaScript events for sections and blocks. These events bubble and are not cancelable. Each event has a target object (event.target), which is the relevant section or block element identified by the associated SHOPLINE data attribute.
The following table outlines the events emitted by the theme editor:
| Event name | Target object | Detail | Bubbles | Cancelable | Trigger | Expected behavior |
|---|---|---|---|---|---|---|
shopline:section:load | Section | {sectionId} | Yes | No | A section has been added or re-rendered. | Re-execute any JavaScript required for the section to function and display correctly, mimicking the initial page load. |
shopline:section:unload | Section | {sectionId} | Yes | No | A section has been deleted or is being re-rendered. | Clean up relevant event listeners, variables and other resources to prevent memory leaks and ensure smooth interactions. |
shopline:section:select | Section | {sectionId, selected} | Yes | No | A section in the sidebar has been selected. | Ensure the section is scrolled into the viewport and remains visible upon selection (auto-scroll). |
shopline:section:reorder | Section | {sectionId} | Yes | No | A section has been reordered. | - |
shopline:block:select | Block | {sectionId, blockId} | Yes | No | A block in the sidebar has been selected. | Ensure the block is scrolled into the viewport and remains visible upon selection (auto-scroll). |
In the table above, blockId represents the block ID, sectionId represents the section ID, and selected represents the selection state of the section. The value of selected is either true or false.
Identifying the theme editor environment
As a developer, you should distinguish between two operating environments: the live storefront visited by customers and the preview mode used by merchants during editing. By detecting the current environment, you can control the execution logic of your code for specific scenarios, ensuring that the preview experience within the theme editor remains consistent with the actual live store.
Once the theme editor environment is identified, you can tailor your code as needed:
- Disable code that is only necessary for the live storefront visited by customers.
- Enable or disable code required exclusively during theme editing.
- Ensure that relevant code executes correctly or is reset when adding, deleting, customizing, or reordering sections.
You can detect the theme editor environment using Sline or JavaScript.
Using Sline
In theme HTML files, use the request.design_mode global variable to detect if the storefront is in the preview mode. This variable returns true when the storefront is being previewed in the theme editor, and false otherwise.
{{#if request.design_mode}}
  <!-- This will only render in the theme editor -->
{{/if}}
Using JavaScript
In theme JavaScript files, use the window.Shopline.designMode global variable to detect if the storefront is in the preview mode. This variable returns true when the storefront is being previewed in the theme editor, and false otherwise.
if (window.Shopline.designMode) {
  // This will only execute in the theme editor
}

'%3e%3crect%20x='6'%20y='7.13049'%20width='13'%20height='10'%20rx='1'%20fill='black'/%3e%3cpath%20d='M12.4998%2012.936L-3.65042%200.604835L28.65%200.604838L12.4998%2012.936Z'%20stroke='white'%20stroke-linejoin='round'/%3e%3c/g%3e%3cdefs%3e%3cclipPath%20id='clip0_716_14611'%3e%3crect%20x='6'%20y='7.13049'%20width='13'%20height='10'%20rx='1'%20fill='white'/%3e%3c/clipPath%3e%3c/defs%3e%3c/svg%3e)

'%3e%3crect%20x='5.63086'%20y='7.26086'%20width='13'%20height='10'%20rx='1'%20fill='white'/%3e%3cpath%20d='M12.1306%2013.0664L-4.01956%200.735206L28.2809%200.735209L12.1306%2013.0664Z'%20stroke='%231A2C42'%20stroke-linejoin='round'/%3e%3c/g%3e%3cdefs%3e%3cclipPath%20id='clip0_716_14599'%3e%3crect%20x='5.63086'%20y='7.26086'%20width='13'%20height='10'%20rx='1'%20fill='white'/%3e%3c/clipPath%3e%3c/defs%3e%3c/svg%3e)